Sounds nice. Unfortunately, most of us don’t have the discretionary income to purchase watches like some people buy clothes – with an eye to match every event with the right outfit. But there is a way to give your wristwatch an instant refresh whenever you want, without breaking your budget. Simply change the band.
Perhaps you’re going to be spending the day diving. Your watch may be rated for dives, but your expensive leather watchband isn’t. Now would be a great time to switch over to a durable and stylish silicone band or maybe a NATO strap (a military-style nylon band that loops under the watch to hold it in a fixed position on your wrist). Going out on a special date with your significant other? Your white silicone band works fine for daily wear, but that silver Milanese Mesh strap will dazzle, and it matches the necklace you’ll be wearing.
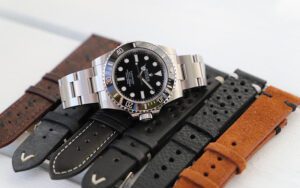
(MonacoCannes / pixabay)
See how fun this is? Your watchband is much like the proverbial little black dress. You can glam it up or casual-ize it at will, and it works for almost every situation. These days, there’s a watch strap out there for virtually any taste and budget.
Watchbands are attached to your case with two spring-loaded bars that fit snugly into each end of your lugs. Lugs are the four metal extrusions on your watch case, two at the six o’clock position and two at the 12 o’clock position. Once inserted through the small loop at one end of the watchband, the spring bar fits like a toilet paper holder rod between the two lugs. Whether your watch is a new Seiko or a vintage Rolex, modern technology has made getting the strap you want to match your case ridiculously easy.
The first thing you’ll want to do is check your watch case and see how the bands are attached. Usually, the case will use one of three attachment systems: Drilled lugs, lug holes, or fixed bars. Next, place your watch face-down on a clean selvyt cloth to ensure that you don’t accidentally scratch your crystal while switching out your straps. Although, if a crystal mishap does occur, we’ve got you covered with some great tips in our two-part series on how to change out your watch crystal.
Next, make sure you have the right equipment, namely a spring bar tool. While this little gadget isn’t indispensable, it sure does make the job of changing your band fast and straightforward. You can usually find a good one at a watch repair shop or on Amazon for under $30. However, if you’re a serious enthusiast, you may want to lay down a couple hundred dollars for the Hodinkee Spring Bar Plier Tool. It’s made by Swiss-based Bergeon and is arguably one of the best spring bar tools on the market.
Drilled Lugs
These will be your most uncomplicated bands to switch out by far. As the name suggests, your lugs will have tiny holes drilled all the way through. This design, which was popular in older watches and now seems to be making a comeback, allows the wearer to use the pin end of the spring bar tool to push the bar out of its seat from the case’s exterior.
You’ll need to use one hand to steady the watch and gently pull the spring bar and band away from the case without launching the spring-loaded bar into the air. Repeat the process for the other end of the bar and then do the same on the other side of the watch.
To re-attach your new band, you need to use the forked end of the spring bar tool. After pushing your spring bar through the loop on the watchband, place one end of the bar into the drilled hole. Then, using the forked side, push back on the spring on the other side, sliding it into the other lughole. The bar is securely seated when you can see the ends in the lug holes from the exterior of the case.
Lug Holes
The process for removing the band for regular lug holes is similar to that used for drilled lugs, only a little more tricky because the holes aren’t entirely drilled through to the exterior of the lugs. You’re working more by feeling than seeing.
Start with the forked end of the spring bar tool this time. Place it between the edge of the watchband and the lug where the bar is in the forked portion. Pressing down to keep the fork and the spring bar connected, pull back on the bar toward the edge of the watchband and up and away from the lug. You may want to have a piece of cardboard placed across from you or use your other hand to catch the pin when it springs loose. Once the pin is out, do the same with the other lug holes.
Re-attaching the band will work the same way as with drilled lugs, only you’ll need to feel the spring bars click into place to make sure they’re in since you won’t see the ends. After the spring bar is in, you may want to use a magnifying glass to peek into the gap between the lug and the band on each side to check. You can also pull firmly on the watchstrap to make sure the pin is secure.
Fixed Bars
These lug pins are just as described – permanently affixed to the lugs and the case. Military watches often had fixed bars so wearers could weave a strong nylon strap through the bars and under the case. This ensured that their watch would stay attached to their wrist in all kinds of situations, including combat. Nylon band styles include NATO, U.S. Military, and Zulu.
While the fixed bars are great for these straps, they didn’t work for two-piece watch bands until recently. Using clasp technology, you can now take a fixed bar watch and attach straps that used to be limited to spring bar systems only. The straps with clasps or clips are relatively straightforward in that you feed them through the fixed bar and attach them on the other side.
If you’re a military strap person but don’t own a fixed bar watch, you can also use these bands interchangeably on spring bar systems. Be aware, however, that the strap won’t be quite as secure on spring bars as it is on fixed bars.
It will still put a substantial dent in your budget to get that Rolex Submariner you want, but at least now you know that customizing it to your heart’s content won’t break the bank. Stay tuned to Times Ticking for more watch repair tips and information.